

Beginning Pour Over Coffee: The Bee House Coffee Dripper

It’s hard not to fall in love with pour over coffee once you’ve tried it. This refreshingly simple coffee-brewing method requires minimal equipment and grants you total freedom to tailor your cup to perfection. Join us as we spill the beans on the best techniques for making pour over coffee and delightful surprises that will make you love it even more.
Pour Over Coffee vs. French Press
Pour over coffee stands out from machine-made and French press brews because of its unique brewing method.
When you rely on automatic coffee makers, you give up control over important brewing factors like water temperature and flow rate. These elements are crucial in altering the flavor and texture of your final cup. Essentially, pour over gives you more power to shape the taste profile according to your preference.
In the case of the French press, pour over coffee offers an additional advantage by using a filter that soaks up some of the oils and chemicals from the beans, resulting in a more balanced brew.
Top Reasons to Love Pour Over Coffee
If you're looking for inspiration to give it a try, we've gathered the top reasons why people make the switch to pour over coffee.
Sweet, Simple Pour Over Coffee
The simplicity of brewing pour over coffee is truly amazing. After years of taking up valuable counter space with a bulky automatic machine, the almost-nonexistent amount of equipment is refreshingly liberating.
You Don’t (Technically) Need to Use Electricity for Pour Over Coffee
Well, you do need a source of heat for your water. However, it's not an essential requirement. If there's a power outage or you're on the move, you can always rely on a reliable camp stove or even start a fire to make sure you have a perfect cup of coffee.
Pour Over Coffee Is an Eco-Friendly Choice
Pour over coffee is eco-friendly and easy to make. The equipment, like glass, metal, or ceramic drippers, is simple and built to last for years without requiring frequent replacements. We recommend the bee house dripper for a few different reasons—but more on that later.
Pour Over Coffee Produces Little to No Waste
Pour over coffee provides unlimited flexibility and customization. With better control over the water and coffee grounds, you can determine the precise quantities required, reducing waste. Let's also consider the filters. Billions of paper filters are thrown away every year. By choosing a reusable filter for your pour over brew, you can greatly reduce paper waste.
Pour Over Coffee Is Portable
If you're often on the move, this may be the best reason to adore pour over coffee—it's highly portable. You can take it with you and consistently enjoy your coffee precisely how you prefer it.
Pour Over Coffee Is Customizable
Tailoring your pour over coffee experience to your unique preferences is easy. Explore different coffee varieties, grind sizes, water temperatures, and pour speeds. If you're passionate about coffee, you can have complete control over every aspect and savor the subtle differences they create.
If you prefer a more scientific approach, you can experiment with isolating variables and keeping detailed notes until you find the perfect formula for your own impeccable cup of coffee.
Pour Over Coffee Really Does Taste Better
While everyone's preferences differ slightly, there is a general agreement that pour over coffee simply has a superior taste compared to machine-dripped coffee. There are a few reasons for this agreement. First and foremost, the ability to customize your brew to perfection plays a significant role. Additionally, the pour over method uses fresh water, which enhances the flavors of the coffee beans.
When you gradually pour hot water over the coffee grounds, it seeps into the grounds, capturing all the different flavors of the beans. Then, you repeat the process with fresh water, enriching the depth of flavor and ensuring a remarkably fresh taste.
Don’t Forget the Pour Over Coffee Ritual
Sometimes, life can feel like a series of automated actions in the morning—getting coffee and diving right into the day with the hope of being productive. But if you pause for a moment and take a few minutes to slowly pour water over coffee grounds, you'll discover something surprising. The tranquility of the moment brings a delightful sensation. You'll feel the warmth of the steamy water and enjoy the aroma of fresh coffee. You'll also have a minute or two to wake up and reflect. This is the true wonder of pour over coffee—the little bit of extra work turns into a delightful morning ritual that adds a touch of magic to your day.
Seven Roasters Pour Over Coffee Method
Don't worry about fancy equipment, difficult terms, or those who make it seem overly complicated. Making pour over coffee may require a little more effort, but we've simplified our method to make it easy and user-friendly. Our focus is on helping you get started without getting caught up in unnecessary details. The whole process should take less than 10 minutes, depending on how long it takes to boil your water.
Starting with Pour Over Coffee: Essentials Made Simple
Getting started with pour over coffee doesn't require an overwhelming amount of equipment. You don't want a bunch of unused gadgets cluttering up your cabinet. To begin, we suggest starting with these essential items. You can gradually add more to your collection as you explore the world of pour over coffee.
|
THE BARE MINIMUM YOU'LL NEED SUGGESTED COFFEES
Limited Edition Micro-Lot
|
OVERVIEW
|
|
Fresh Coffee Beans—the Fresher the Better
To achieve the best pour over coffee flavor, the freshness of your beans is crucial. At Seven Roasters, we place great importance on freshness and mark the roast date on each bag so you can always know how fresh it is. Generally, freshly roasted coffee is at its best within the first week. But with proper storage, you can still enjoy its excellence for two to four weeks (and it will far surpass any grocery store coffee).
Dripper and Filters
If you're new to the world of pour over coffee, we highly suggest trying out a bee house dripper for a few good reasons. Firstly, it has been a trusted choice for both cafes and homes for many years. It's especially great for beginners in pour-over brewing. Plus, you can easily find affordable Melitta #2 or #4 filters at your local grocery store. This makes bee house drippers stand out compared to others that require specific filters, which can be more expensive and harder to find.
Kettle
While any kettle will work, using a gooseneck kettle makes the process much simpler. However, if you're just starting your pour-over journey, we recommend using the kettle you already have, even if it doesn't have a gooseneck spout. Once you develop a love for pour over coffee brewing, you can think about upgrading your kettle.
Carafe or Mug
When making a single cup of coffee, the bee house dripper is convenient as it sits nicely on your mug. It can also fit securely on different coffee maker carafes, possibly eliminating the need to buy an extra item. If you prefer a pour over container specifically, Hario offers various options known for their quality and reputation.
Extras You Might Want (Totally Optional)
When you get comfortable with making pour over coffee and want to step up your game, there’s some gear that is not required, but can make your brewing process even smoother.
Gooseneck Kettle
Investing in a quality gooseneck kettle can be a game-changer and is our top recommendation for those who are serious about pour-over brewing. The gooseneck spout ensures a consistent, precise, and easily adjustable water flow. Stovetop options are more affordable, and the Hario Gooseneck Stovetop Kettle has proven its reliability over five years of regular use for both coffee and tea. If you prefer an electric alternative, Bonavita's Electric Kettle is a go-to choice for countless coffee enthusiasts.
Burr Grinder
If you enjoy using whole beans and are passionate about pour over coffee—or simply want to enhance your gear—investing in a Burr grinder is definitely worth it. The Baratza Encore comes highly recommended. We've been using it at home for nearly two years without any issues.
For a comprehensive guide on grinders, we suggest checking out Wirecutter's write-up. While electric Burr grinders can be a splurge, if you're conscious about your budget and open to manual grinding, consider Hario's Skerton Pro grinder. It has a larger capacity compared to most manual options, making it ideal for brewing larger amounts of coffee.
Scale
Improve precision and consistency in your pour over coffee brewing process with a compact and affordable scale. It's a small investment that pays off by reducing guesswork and improving your results. However, if you're unable to get one right away, it's still possible to manage without it.
Timer
If you prefer not to use your phone's timer, there are plenty of affordable standalone timers available, many of which operate on regular batteries. These timers come in handy not only for brewing pour over coffee but also for cooking or baking, making them a versatile addition to your kitchen.
Step-by-Step Guide to Bee House Dripper Pour Over Coffee Brewing
Yields 2-3 mugs of coffee.
Step 1
Boil 550 grams of water and measure out 30 grams of coffee. This specific ratio is crafted to make around 16 ounces of coffee, which is enough to fill 2-3 mugs. It serves as a great starting point for your pour over adventure.
If you’re interested in making more or less, see our pour over coffee chart as a reference.
| Approximate Cups of Coffee |
Water
(approx fl oz) |
Water (g) | Coffee (g) |
Coffee (approx tbsp) |
| 1 | 8 | 250 | 15 | 2 |
| 2 | 12 | 350 | 21 | 3 |
| 3 | 16 | 500 | 30 | 4 |
| 4-5 | 24 | 750 | 45 | 6 |
Step 2
Grind your coffee. When making pour over coffee, aim for a grind size similar to sea salt. Using freshly ground whole beans enhances the freshness of your brew. If you only have pre-ground coffee available, that's perfectly fine, and you can move on to the next step. Just remember that using pre-ground coffee may result in a less flavorful cup.

Your ground coffee should roughly resemble sea salt.
Step 3
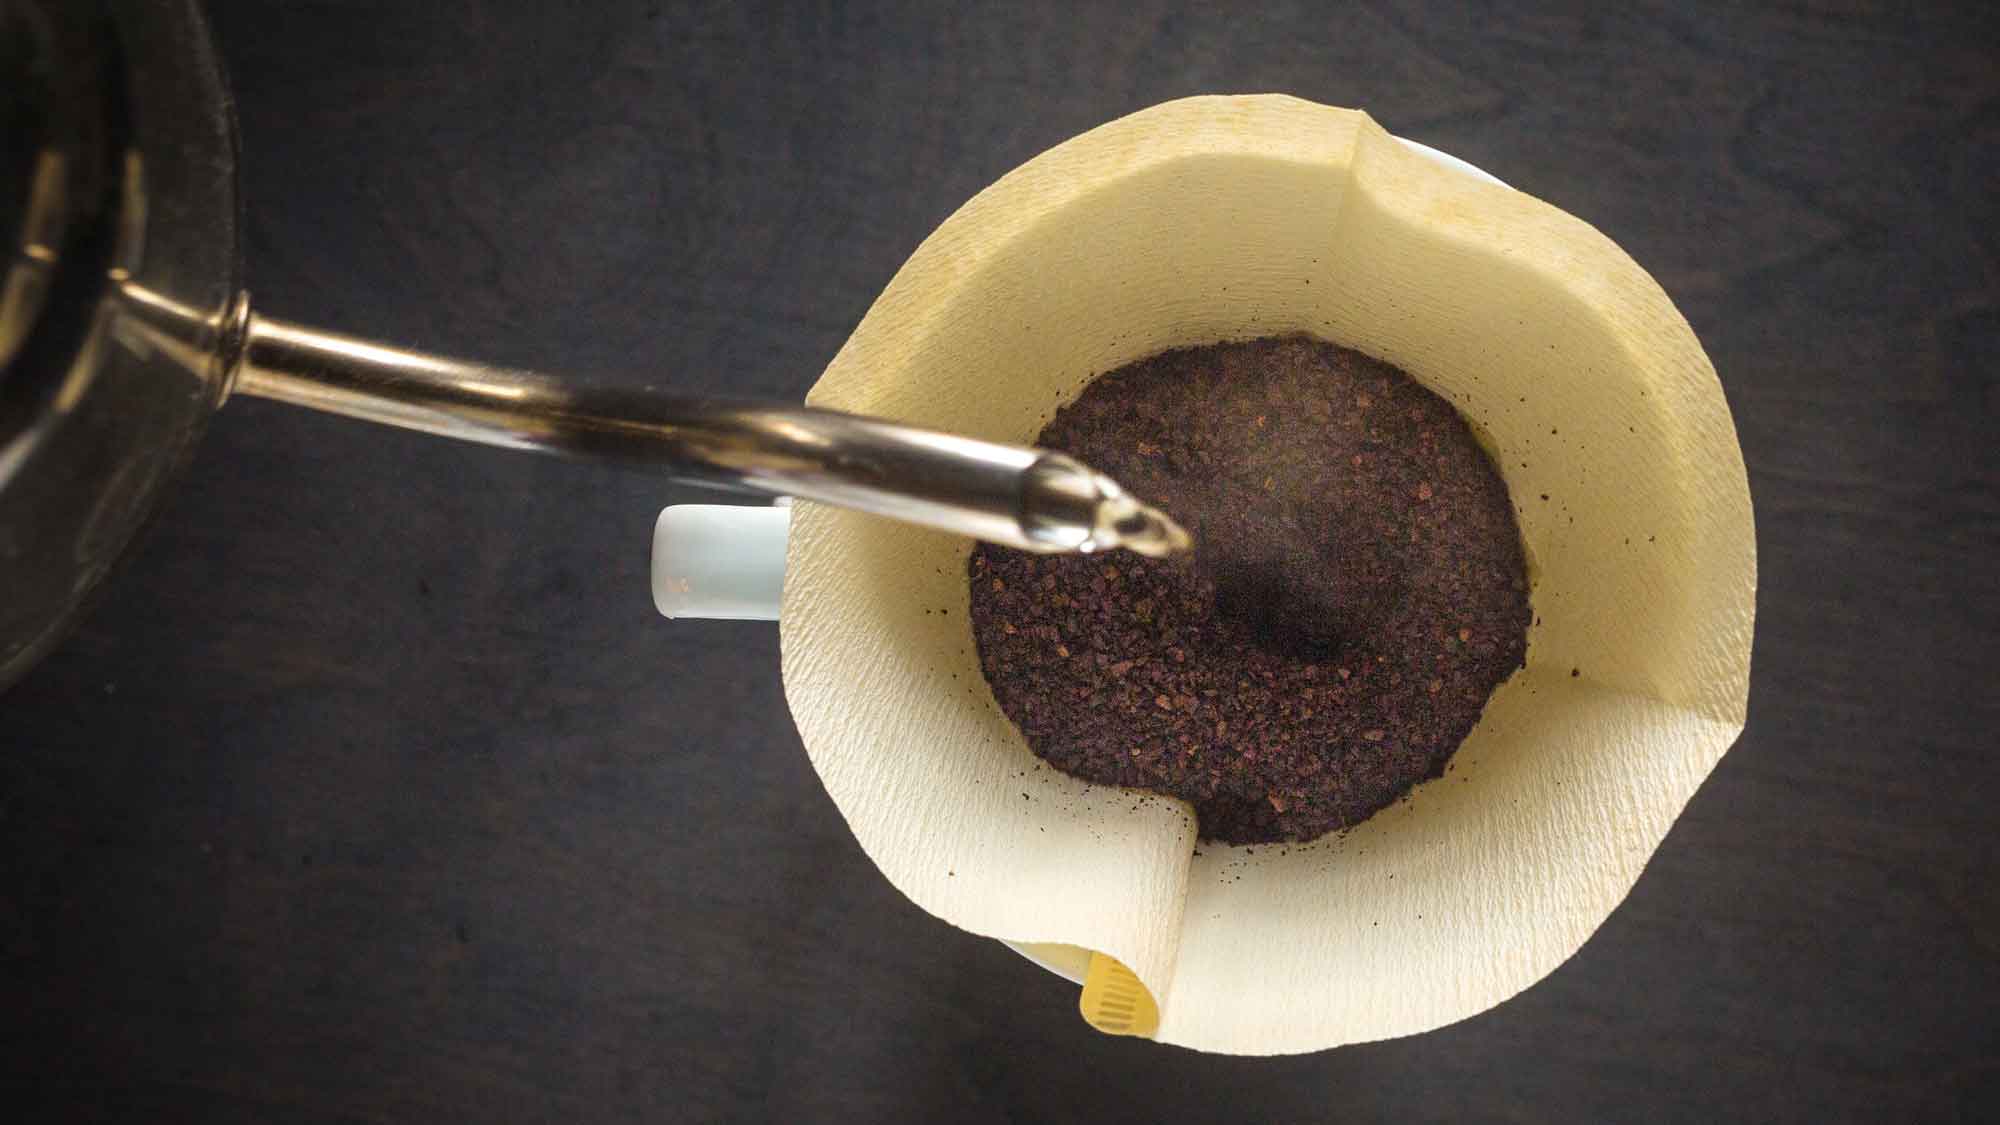
Prepare your filter, dripper, and ground coffee. Fold the filter along its edges and unfold it to ensure a snug fit in the dripper. Place the filter into your dripper. Make sure it sits open and ready. Carefully place your measured coffee grounds into the prepared filter. Now, it's time to wait for the water to reach a boil.
Step 4
If you're using a scale, take this time to make sure it’s calibrated. Occasionally, it's easy to overlook this step, but its importance will become evident. If you're not going to use a scale, simply move on to the next step.
Step 5
Start the timer. During this step in the bee house dripper pour over method, the bloom stage occurs. The timing for this stage is from 0–45 seconds.
As soon as your kettle boils, it's time to start brewing. Begin your timer and pour an amount of water that is two to three times the weight of your coffee, which is approximately 60-90 grams of water. Make sure to evenly cover all the coffee grounds so they become completely saturated. If you don't have a scale, visually estimate this. Are all the grounds uniformly soaked? Pay attention to any dry patches to ensure proper saturation.
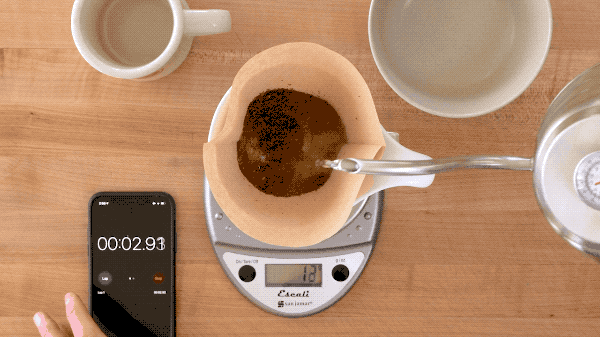
Timing: 0:00 to 0:45
Step 6
Allow the bee house dripper to work its magic. This may require some patience. Wait until your timer reaches the 30–45 second mark before moving on to the next step. During this time, you will see some gentle bubbling in the coffee grounds. This pleasant sight indicates that CO2 gas is being released from the beans, which is a sign of their freshness.

Step 7
Complete the final pour. Timing is crucial here, starting from the 45 second mark and lasting until approximately two to two-and-a-half minutes.
To begin, pour the remaining water evenly and consistently across all of the coffee grounds, ensuring a steady flow from the kettle. As you do this, you'll notice the dripper gradually filling up, which is what you want. If you have a scale, stop pouring once it shows around 550g. While being precise is helpful, don't worry too much about being exact. If you're within 5-10 grams of the final weight, it won't significantly affect the taste of your coffee. If you don't have a scale, just keep pouring until you run out of water.

Timing: 0:45 to 2:00-2:30
Step 8
Enjoy the aroma and wait. As the water slowly drips through the coffee grounds, it's important to be patient. Around the two to two-and-a-half minute mark, the brewing process should be finished, and only the coffee grounds will remain in the filter. Your freshly brewed coffee is now ready to be savored!
For a more flavorful experience, you might want to let it cool for a couple minutes before taking your first sip.
Just Brew It
Making pour over coffee does take some practice, but once you’ve got the hang of it, it’s an immensely satisfying experience. The flavors that can be achieved with pour over are simply delicious—you can tailor your own cup to taste and brew in whatever way you prefer. Plus, unlocking the complexity of each coffee variety by taking control of the brewing process is an experience like no other.